Tomorrow I very carefully transport the pieces to school for the firing. I'm going to be using a slow fire electric big ass kiln to fire them. Each piece will go for three days! In a slow fire the kiln will very slowly rise in temperature, then hold that temperature for an allotted amount of time, then go up to your next programmed temperature, etc... and it cools down in the same way. You have to program the process which essentially means punching temperatures and hold times and then cool down times. There's a procedure to it and I've done this several times with smaller kilns but for this piece I'm having the manager of the ceramics studio program it for me. I'm nervous because this process is where the piece could crack and pieces could fall off if this happens. If so, I'll modify the end result and make it look cool but I really hope it doesn't have problems. I took extra special care to make sure it was built structurally sound and tried to keep separate parts of it drying at the same time.
Cross your fingers!
Tuesday, February 28, 2012
Thursday, February 23, 2012
Kittehs and family
Kitteh introduction:
Sparkles! She's sort of the Jaba the Hut of the family. We got her when she was 7 from the Humane Society. There were a bunch of cute kittens there but they were all sleeping in their litter boxes and seemed a little cross eyed. She acted all cute at us and stuck her hand out of the cage and meowed. They wrapped her up and when we got home she got out of her box and ran across the floor and her belly was flapping from side to side and you could see it from the back. Her belly is obscene. She's around 14 years old now and doesn't come out of her fortress (which is a cabinet in the kitchen) much because the younger cats are jerks to her. She's a little bit grumpy.
Sparkles
Belial. This cat is dead sexy. He's named after a monster from the b horror flick Basketcase. His fur is super soft and smooth and perfect and he always manages to sit/lay as if he's modeling. He's all smushy and awesome when you pick him up. He got the looks, but he did not get the brains. He and I had a bit of a falling out for a while there because he hates my art. I used to work on ceramics in the living room and when it was finished and drying, he'd always find a way to smash it. I worked on this one piece for about a week - it was a six toed foot and one of my favorite pieces ever and I put it in the bedroom to dry. Couple of days later I heard a smash and belial was just sitting there on my drying board looking at me with dead eyes. He managed to smash about 7 pieces. We've since made up and I work on art in the studio, and he's never ever ever ever ever ever going to be allowed in there.
This is him as a kitteh!
This is him after he grew into his beautiful face!


Vito! My friend Vanessa was fostering him after he got his spa treatment from the Trap Neuter Return program http://catsinmyyard.com/. I came over one day and saw him and had to have him.
I know you're not supposed to have a favorite or whatever but he is my favorite cat. Vito is a bit of a dick but he's also the most cuddly adorable awesome cat ever. I taught him how to fetch and he has his own special fetch ball called mr. smiley. Belial has a white puff that he fetches sometimes too and I trained them to only chase their own toy.
 Vito giving Belial lessons on how to be a bit of a dick. This is how you terrorize Hannah the fish.
Our air conditioner broke so we iced the kittehs down


Smush!


 Cute!
Cute!


Sparkles! She's sort of the Jaba the Hut of the family. We got her when she was 7 from the Humane Society. There were a bunch of cute kittens there but they were all sleeping in their litter boxes and seemed a little cross eyed. She acted all cute at us and stuck her hand out of the cage and meowed. They wrapped her up and when we got home she got out of her box and ran across the floor and her belly was flapping from side to side and you could see it from the back. Her belly is obscene. She's around 14 years old now and doesn't come out of her fortress (which is a cabinet in the kitchen) much because the younger cats are jerks to her. She's a little bit grumpy.
Sparkles

Belial. This cat is dead sexy. He's named after a monster from the b horror flick Basketcase. His fur is super soft and smooth and perfect and he always manages to sit/lay as if he's modeling. He's all smushy and awesome when you pick him up. He got the looks, but he did not get the brains. He and I had a bit of a falling out for a while there because he hates my art. I used to work on ceramics in the living room and when it was finished and drying, he'd always find a way to smash it. I worked on this one piece for about a week - it was a six toed foot and one of my favorite pieces ever and I put it in the bedroom to dry. Couple of days later I heard a smash and belial was just sitting there on my drying board looking at me with dead eyes. He managed to smash about 7 pieces. We've since made up and I work on art in the studio, and he's never ever ever ever ever ever going to be allowed in there.
This is him as a kitteh!

This is him after he grew into his beautiful face!


This is belial airing his junk:
Vito! My friend Vanessa was fostering him after he got his spa treatment from the Trap Neuter Return program http://catsinmyyard.com/. I came over one day and saw him and had to have him.
I know you're not supposed to have a favorite or whatever but he is my favorite cat. Vito is a bit of a dick but he's also the most cuddly adorable awesome cat ever. I taught him how to fetch and he has his own special fetch ball called mr. smiley. Belial has a white puff that he fetches sometimes too and I trained them to only chase their own toy.
Vito and Mr. Smiley!

 |
| Full grown kittehs |
 Vito giving Belial lessons on how to be a bit of a dick. This is how you terrorize Hannah the fish.
Hannah and Vito when she had dark hair 

Our air conditioner broke so we iced the kittehs down


Smush!


Me and Hannah

 Cute!
Cute!
John...dang he's good lookin


Tuesday, February 21, 2012
PROGRESS - WET CLAY FIGURE FINISHED 2/21/12
Okay!


I ended up remolding the face again, I think maybe twice more. The 10th one was actually okay except that I realized her chin was like five inches from her neck when I photographed it which made her look like a sphinx so I cut it off again. Here's that nonsense on which I wasted five hours:

I finally figured out how to do it. Eleventh try is the charm! I ended up putting the clay in the mold and pulling it out two hours later. After that I cleaned up the face because, for the mold, you have to block in all of the undercuts with polymer clay so that you can pull the object out after casting. What this means is that for all twelve faces, I had to remake the eyes and nose holes, both of which take way longer than one might think. Then I let the thing air dry/harden for another two hours except for the outer portion of the back of the face which I covered with plastic. I then hollowed out the face and let it harden yet again so that when I went to push it on, it wouldn't warp. I carefully laid the faceless girl torso down on her back and slipped and scored the head hole (hmmm) and then did the same for the back of the cast face. I pressed the face onto the hair using all of the dips. So, what this means is I pressed under the eyes, under the lips, and under the chin, and used my palms to lightly press the cheeks. Before cleaning up the face again (because when I pressed it slightly deformed) I let it dry, yet again. Took another two hours to make the ear and then I carefully cleaned up the face and at the advice of my husband, stopped f*cking with it. Viola! It's still maybe 3% weird but I'll take it.


Because of all of the issues, I had a bunch of faces that I'd cut off of the sculpture so I putzed around some and made some other things from the faces for the rest of the day on Friday. I loved the little nose mouth tile and ended up making a bunch of them. Cow-Boy is my favorite of the heads.


My husband's father and step mother came in for a few days and so I took some time off to do fun things on Saturday and Sunday. We went to see Shakespeare's Midnight Summer Dream at the Shakespeare theater and it was awesome. They left on Monday and I came down and prepared the legs for assemblage on Tuesday.
On Tuesday 2/21 I assembled the shorts, legs (which had been air drying except for the ends since Friday) and shoes. I used dowels to act as the leg bones to keep a vaguely natural posture and stance, except that I made the knees slightly knocked because that's how little kids stand. I let it dry for an hour and held my breath and tried standing it up. Holy crap! It worked? No way.
YES! This thing is standing on it's own two feet.


It feels really weird to be finished with this part of the project. I've been in the studio so long I've gotten used to doing this every night and that feels good.
I've been looking at books for inspiration for my next project. I really love Beth Cavaner and Pamela Earnshaw Kelly's animal sculptures. I love monkeys/apes/gorillas. Since I can't have one and rarely get to touch them, I might make a few to hang around the house.
I've also been thinking about one of my closest friends and old band members today. Knox (or Kayte, or Kate now?) moved to New York last summer. We used to do hilarious crazy stupid fun psychedelic shit together and she is one of the most unusual and awesome people in the world. We recorded this song together with my husband for a songwriting challenge that we participate in sometimes. She can sing like a mofo. Our friend Jodi wrote the lyrics. I MISS KNOX. I wish I could reach into the internet and pull her through it to Chicago. She will come to see us March 24th! I cannot wait.
Cornhole:
I also want to add that when I'm downstairs in the studio, time makes no sense. Twelve hours feels like an hour. My studio is magic.
Wednesday, February 15, 2012
Progress 2/15/2012
So, the last five days have been sort of difficult but partially successful. I molded the face and attempted to attach it five times. I guess I got super distracted on 2/11 and made some other stuff with the failed molded faces which was fun, but didn't really fit in with the timeline I've set up. What a huge pain in the ass that has been. Actually it's been a learning experience that is invaluable but still, huge pain in the ass. I finally did get the thing attached after having it slump on me, over and over again. So because of the distortion that happens when I press it into the hair (I'll go into this later, jesus christ this was frustrating) I've remade the face now, pretty much from scratch, 9 times. Yesterday was partially triumphant and partially insanely frustrating. I'll add pictures later. I finished the hands and arms. They look a little blocky but they're fine and they're finished. I made some shorts but they're sort of funny right now.
 Here's a failed face...I was mad so I Billy Idoled her.
Today I had to go into work. Normally I work from home and it's great. I have a little messenger program that is up all day long so they know I'm not fucking around. I actually don't. Giving me the ability to work home was the smartest thing anyone has ever done. I work overtime anytime they need it without question or resentment. I haven't switched companies in eight years and I'm an IT geek. Nobody does that, unless they get to work from home. Loyalty! I go to the office now every two weeks on Wednesdays. For 8 years I didn't even have to do that but after being bought out three times in the past eight years and switching bosses FIVE times in the past year, they're going to attempt to socialize me with my, ahem...'team'. I actually love my job, or at least the part where I get to develop new stuff. Seriously. The puzzles that come along with coding and development is exactly what I need to balance the creative side of my brain. Today I started learning SAS when I was in the office and it's awesome. However, working in an office in 2012 is total nonsense. Working in a cubicle day after day is soul crushing, energy sucking, lifeless, pointless, boring, lonely, pathetic, shitty and the opposite of what humans need to feel on a day to day basis.
Tonight was a mental health night. Tomorrow I go back and try to remold the face ... or use what I have. We'll see.
Friday, February 10, 2012
Progress 2/10/2012
As of 1am last night:
I added the shelf to the torso and it slumped a little though I let it sit for hours before attaching it. It was a little nerve wracking but I was able to get it attached. Had to turn it sideways on a cushion to flatten the shelf back out and it didn't crack, which is a good sign that it's built well. Look ma! No cracks! I gave the legs another shot and failed. I think I have to use the coil method instead of laying it out on a slab. Legs are too long and would have to be too hard to work them properly when they're leather hard without them falling flat. I pulled the face out of the press mould and it worked beautifully. It was my test mould so I've got to do another one tonight.
warning: shameless promotion day
For the first four hours I listened to the stylings of my husband's new doom metal (?I guess?) band Jap Heron because my art studio is directly next door to the music studio in my basement. He's playing the drums which is what I usually do so that's cool. They're great. Nothing recorded yet but here's the page. http://www.facebook.com/pages/JapHerron/278785468824154?ref=ts&sk=wall
Speaking of bands, my band (along with John Barlow, Jim Birch and Vanessa Smetkowski), The Columbines (http://www.facebook.com/Columbines) have a show on March 17th at Quenchers at 10 pm. The show that I'm making this project for is opens the night before and is open all day on the 17th so I will be celebrating.
School of the Art Institute of Chicago Opening Event: BFA Exhibition
Fri, March 16, 7pm – 9pm - This is the opening.
Sat, March 17, 11am - 6pm - Most artists will be there all day the next day as well.
The show is open until April 4th.
Thursday, February 9, 2012
Progress 2/9/2012
2/9/2012
In the words of Ice Cube, today was a good day.
I finished the torso with the armstumps looking alright. I pulled out the slumping s-o-b and it still slumped so I let it air dry for a while. I attached the other arm and filled it with some trashbags to make it so it filled out nicer. I also added the wrinkles to the shirt. That part was interesting. I haven't made clothes in porcelain clay before and I had my husband stand with his hands out and took a picture. I copied the wrinkles in his t-shirt onto the torso and voila. This is a much better torso than the first one I made which was all flat and boring and looked like it belonged on a robot instead of a kid. Again, rebuilding this was a good idea.

The reason the torso looks short here is because I have to build a shelf system inside of it for the shorts to sit in. I'm firing two pieces - head/torso and shorts/legs/feet. The shorts will slip inside the torso and I'll epoxy them together after they're fired. So I score the shelf and the bottom of the torso, apply slip and connect. Then I connect a wall at the bottom after I feel the shelf has hardened enough to provide the area for the shorts to slip inside.


I have clay in the press mold for the face. I'm also working on the legs tonight.
Wednesday, February 8, 2012
Progress 2/8/2012
2/8/2012
Today I was less productive than I'd hoped. I was pretty burned out and had a hell day at work. It was the kind of day where someone emailed me the same question forty times (31 for reals) and I answered the same way every time explaining that the thing she wanted doesn't exist and she just couldn't understand that sometimes you can't fucking get what you want. Ahhh! This is what happens when parents don't tell their children no. Tangent over. I did get the torso up to the neck area completed but working on the torso was no fun because though I know not to build it too high because of slumping, I kept building it too high because I was impatient and of course it slumped. I attached one arm to the torso but that was too wet as well and caused additional slumping. I had to wrap it and put it away because I was too frustrated.
 I made socks on top of the shoes and an unsuccessful leg that looked like the girl had polio. I figured out that you have to wrap the clay around a cardboard tube and let it harden over night before you start to work it.
Though no one has every accused me of being a clean freak, cleaning up after each thing you work on is really important. If you don't clean the floor, you're stepping on crunchy clay and there are trash bags everywhere. If you don't clean your tools then you're grabbing tools that have hardened clay nuggets stuck to them that will destroy the details and get into your wet clay. I dust the shelves, sweep the floor, wipe down the counters, and do a quick wet mop every time I switch to a new thing. I'm probably doing this five times a session.
The studio feels like home now but it needs to be purged of a bunch of crap that we don't really use. When I make projects of whatever kind (sewing, ceramics, painting, jewelry, photography, printmaking, booking making, etc...) I tend to buy way too many supplies so I don't run out in the middle of the project. My dad is the guy who has pallets of diet coke in his basement so he doesn't run out so I guess that's where I get it. The supplies have built up over the years and I have a surplus of fabric/fauxfur/plea-leather/ink/canvases.... I have a Bissel 67 enlarger in the corner of the studio taking up a ton of room that hasn't been used for 8 years. After this week I'm going to figure out what we will realistically use and give the rest to Wishcraft (awesome kid's art studio!) and sell the enlarger.
tomorrow will be a better day
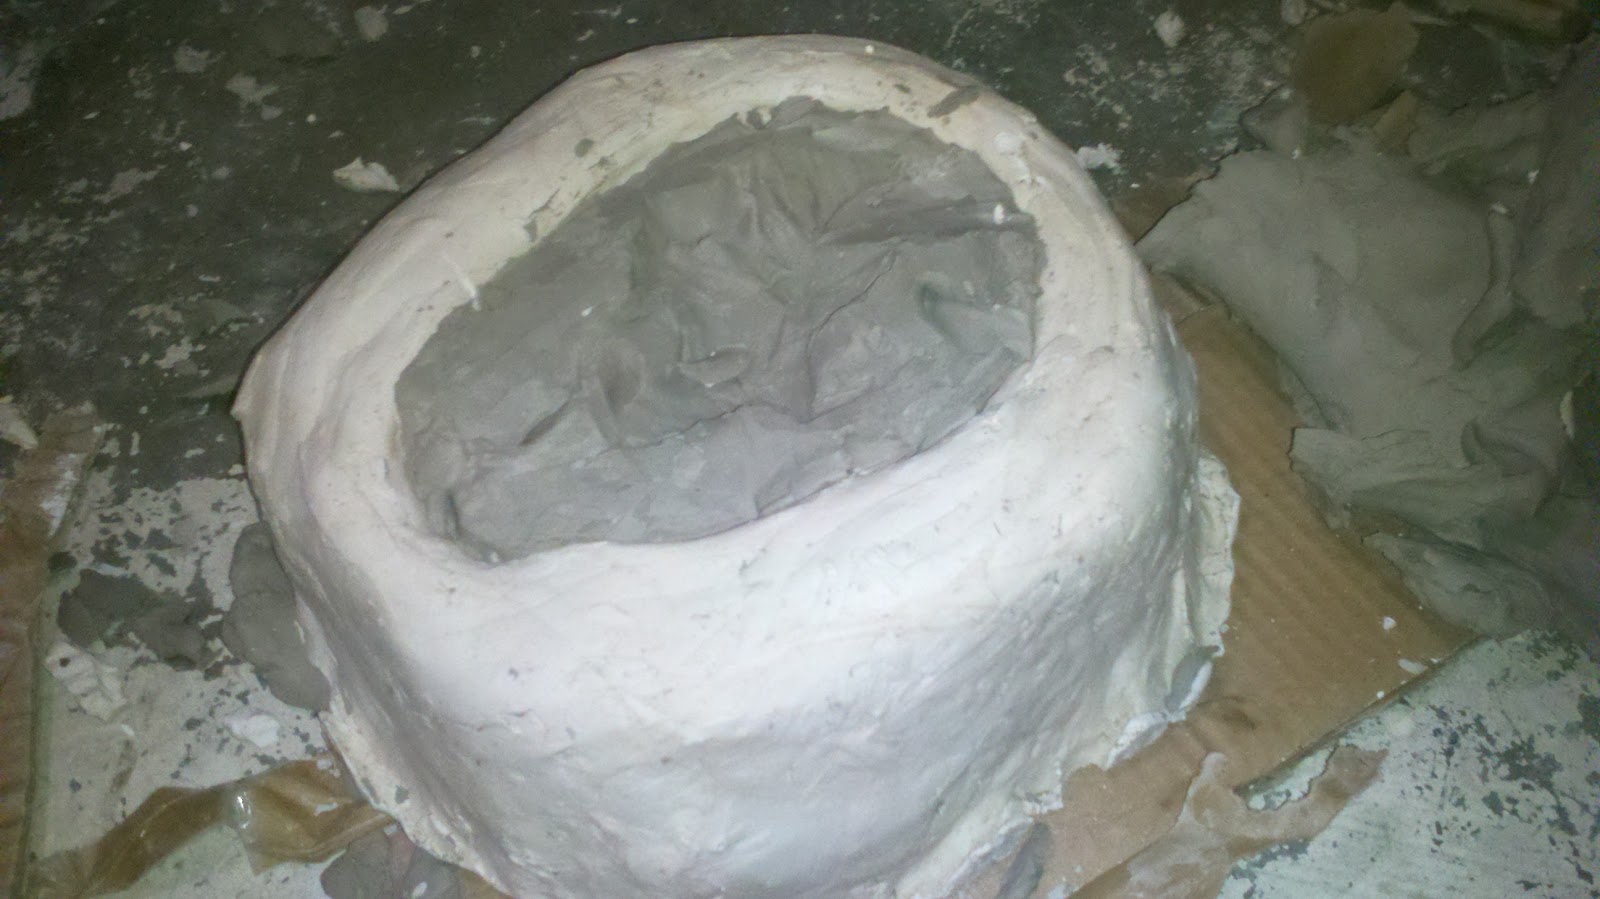
 |
| slumper! |
 I made socks on top of the shoes and an unsuccessful leg that looked like the girl had polio. I figured out that you have to wrap the clay around a cardboard tube and let it harden over night before you start to work it.
 Though no one has every accused me of being a clean freak, cleaning up after each thing you work on is really important. If you don't clean the floor, you're stepping on crunchy clay and there are trash bags everywhere. If you don't clean your tools then you're grabbing tools that have hardened clay nuggets stuck to them that will destroy the details and get into your wet clay. I dust the shelves, sweep the floor, wipe down the counters, and do a quick wet mop every time I switch to a new thing. I'm probably doing this five times a session.
The studio feels like home now but it needs to be purged of a bunch of crap that we don't really use. When I make projects of whatever kind (sewing, ceramics, painting, jewelry, photography, printmaking, booking making, etc...) I tend to buy way too many supplies so I don't run out in the middle of the project. My dad is the guy who has pallets of diet coke in his basement so he doesn't run out so I guess that's where I get it. The supplies have built up over the years and I have a surplus of fabric/fauxfur/plea-leather/ink/canvases.... I have a Bissel 67 enlarger in the corner of the studio taking up a ton of room that hasn't been used for 8 years. After this week I'm going to figure out what we will realistically use and give the rest to Wishcraft (awesome kid's art studio!) and sell the enlarger.
tomorrow will be a better day
Progress 2/7/2012
2/8/2012
...after the advice from the instructor to mould only the face and rebuild the rest


Eight hours later I started to peel away the sides.
Flipped it over and the head was stuck. I started digging it out while calculating how long it took me to make the face because I thought I'd have to remake the entire thing.
 It finally popped out. Whew!
 1. Roll it out.
 2.Wrap around dowel.
 3.Score and slip.
 4.Connect.


...after the advice from the instructor to mould only the face and rebuild the rest
 |
| It went from this |
 |
| to this |
I went home and cut the thing in half. I thought I could maybe recast the entire front but in rethinking it, he's right. Plus, I didn't really like the texture of the shirt or the shape of the chest. My kid says, "Ooh! You get a do - over!" which actually was pretty great in retrospect because I didn't really like how smooth and robotic the torso looked. I'd gone to Dick Blick and gotten the Rub-R-Mold and what I'd calculated to be enough plaster just in case the Rub-R-Mold wouldn't work and I realized I'd calculated for only the head, not for the entire mould. My husband was nice enough to go out and get me more plaster for me Monday night. He's pretty great.
First thing in the morning before work on Tuesday I made (a huge mess) the plaster to pour into the mould. If you've ever worked with plaster you know this shit is horrible. It's terrible for your respiratory system - I had an respiratory infection that lasted two months from plaster last year. It's ridiculously messy, hardens too quickly (even if you retard the process), is super heavy, and god forbid if you don't get the lumps out or let it sit too long or too little before stirring, and bubbles are always a problem too. So I sifted through the dry plaster quickly with my hands and thought I'd gotten most of the lumps out. I measured everything very carefully on the food scale, made sure the water was 70 degrees, prepared a water bath for my hands and tools afterwards so I wouldn't destroy the sink and had my stirrer ready. I started sifting the plaster into the water with my hands (never do the opposite!) and realized I'd done a terrible job getting the lumps out, which is a huge problem. Since the plaster hardens so quickly after mixing I had to keep sifting it into the water or start from scratch. After waiting two minutes (necessary) I stuck my hand into the bucket to try to get the lumps out...nope, they're staying. There are way too many lumps! The bucket I thought was plenty big enough was actually EXACTLY big enough to hold the plaster and water so when I stuck my hand in the plaster was all sloshing over the sides. I realized I'd have to get a colander from upstairs to use to sift the wet and quickly drying plaster into the mould and ran up to get it getting plaster on everything in my wake. I called to my husband for help. "Please come down and help me, right now!" He held the colander while I poured the plaster in but it was way too lumpy so it clogged the colander. I ended up just coating the face with non-lumpy plaster and it took so long that I realized it was now or never and poured the entire bucket and all of the plaster came out - plop. It made it into the mold but of course splashed everywhere. Moral to the story is GET THE LUMPS OUT. I'm buying a sifter immediately.
 |
| Sexy finished mould |
I crossed my fingers and started work for the day. I made the mould of clay in a box instead of the normal masonite walls because I didn't feel like making a set of walls. Next time I will be using clamps and walls.

Eight hours later I started to peel away the sides.
Flipped it over and the head was stuck. I started digging it out while calculating how long it took me to make the face because I thought I'd have to remake the entire thing.
It finally popped out. Whew!
I made some arms like this:

 2.Wrap around dowel.
 4.Connect.
5. Make it look like an arm.
I made some shoes too. This part was the most fun, though it was pretty late when I started.
Roughed out converse:
Finished Converse:

I also built the torso but that part is super boring.
My list for today!
Finish
torso and neck.
Attach arms.
Start on wrists and hands.
Cast face.
Make the back of head.
Add socks to shoes.
One thing I've learned during this project is that when the clay
is super wet, you need to have four or five things going on at a time. So you coil another coil and put it on the
torso, then you go over and work on the shoes, then you work on the hands, then
you work on the arms, repeat. That way,
the clay dries a little and is strong enough not to slump, otherwise you're spending an f-load of time fixing slumping wet clay.
Back to work.
Subscribe to:
Comments (Atom)